(→Loot) Tag: sourceedit |
(→Guide) Tag: sourceedit |
||
| Line 28: | Line 28: | ||
===Vosik, the Archpriest=== |
===Vosik, the Archpriest=== |
||
| − | Vosik is next encountered in the Splicer Den, standing on a platform overlooking a large room divided into 3 lanes, with spinners on the ceiling and four small rooms on the sides. He will be accompanied by a large number of minions and again protected by an impenetrable shield. |
+ | Vosik is next encountered in the Splicer's Den, standing on a platform overlooking a large room divided into 3 lanes, with spinners on the ceiling and four small rooms on the sides. He will be accompanied by a large number of minions and again protected by an impenetrable shield. |
Shortly after the encounter begins, spinners in the ceiling of the room will activate and drop three SIVA charges; their exact positions vary but there will always be one on the left, one on the right, and one on the center. Guardians must gather these charges and synchronize their throws to hit Vosik with all three charges simultaneously to maximize damage to his shield. |
Shortly after the encounter begins, spinners in the ceiling of the room will activate and drop three SIVA charges; their exact positions vary but there will always be one on the left, one on the right, and one on the center. Guardians must gather these charges and synchronize their throws to hit Vosik with all three charges simultaneously to maximize damage to his shield. |
||
| Line 39: | Line 39: | ||
Upon death, Vosik will drop rewards and a SIVA cache will appear on the central platform. A passage will open at the rear of the right-side clean room closest to the monitors, leading to another jumping sequence and the next encounter. |
Upon death, Vosik will drop rewards and a SIVA cache will appear on the central platform. A passage will open at the rear of the right-side clean room closest to the monitors, leading to another jumping sequence and the next encounter. |
||
| + | |||
| + | ====Heroic==== |
||
| + | |||
| + | Six SIVA charges are dropped per syb-cycle instead of three, and Vosik's shield is twice as strong to ensure that the sub-cycles and encounter take roughly the same amount of time to complete if all charges are thrown accurately. |
||
===Siege Engine=== |
===Siege Engine=== |
||
| Line 52: | Line 56: | ||
The siege engine will continue along until it comes to a large gap in the wall, at which point it will (slowly) drive over the edge and topple into the sea. A loot chest is available on a rocky outcropping at the bottom of the gap, along with the path to the next area. |
The siege engine will continue along until it comes to a large gap in the wall, at which point it will (slowly) drive over the edge and topple into the sea. A loot chest is available on a rocky outcropping at the bottom of the gap, along with the path to the next area. |
||
| + | |||
| + | ====Heroic==== |
||
| + | |||
| + | A [[Walker]] is dropped in front of the siege engine's ramp at the same time that Meksis arrives. |
||
===Perfection Complex=== |
===Perfection Complex=== |
||
| Line 63: | Line 71: | ||
Completing the third cycle will depower Aksis and deliver loot to the center of the area. The final encounter of the raid may be completed by shooting the glowing region on his chest. |
Completing the third cycle will depower Aksis and deliver loot to the center of the area. The final encounter of the raid may be completed by shooting the glowing region on his chest. |
||
| + | |||
| + | ====Heroic==== |
||
| + | |||
| + | There are three gun turrets in the area, one covering each section. The turrets will regenerate about 20 seconds after being killed, and will continue to do so for the entire encounter. |
||
===Aksis, Archon Prime=== |
===Aksis, Archon Prime=== |
||
| Line 76: | Line 88: | ||
When Aksis is reduced to a small amount of health, he will teleport to the middle of the stage and again use his ultimate attack, but this time he will remain vulnerable to damage and must be killed before the attack fires. If the guardians succeed, he will die and the raid will be completed. Unlike other raids, the fireteam will be automatically returned to orbit after five minutes post-kill. |
When Aksis is reduced to a small amount of health, he will teleport to the middle of the stage and again use his ultimate attack, but this time he will remain vulnerable to damage and must be killed before the attack fires. If the guardians succeed, he will die and the raid will be completed. Unlike other raids, the fireteam will be automatically returned to orbit after five minutes post-kill. |
||
| + | |||
| + | ====Heroic==== |
||
| + | |||
| + | Dropping Aksis's shield now requires seven SIVA charges; nine servitors will spawn per round to provide them. |
||
==Chests== |
==Chests== |
||
Revision as of 12:59, 24 October 2016
- For the quest, see Wrath of the Machine (Quest).
Wrath of the Machine is a raid in Rise of Iron.[1] It was made available on September 23, 2016 at 10am PDT.[1]
Guide
Opening the Door
The fireteam starts in Foundry 113. There are three spinners in the area which require voltage to operate- in the center, and to the left and right of the central platform. Voltage may be gathered by guardians coming into contact with glowing plates scattered throughout the area. Touching a charge plate will grant the guardian a level of voltage, and four plates must be touched for the guardian to reach maximum voltage. Once maximum voltage has been attained, it may be delivered to any spinner by standing in the ring around it and pressing square/X. If a Guardian collects any voltage and fails to collect more or deliver it to a spinner before the timer expires, they will die.
Each spinner requires four voltage deliveries to reach full power. Once a single spinner has reached this level, Vosik will spawn on the central platform and periodically teleport to other locations. Voltage Eaters (large shanks resembling the boss of the Fallen S.A.B.E.R. strike) will also appear and attempt to drain voltage from the spinners. Once all three spinners have been brought to maximum voltage, they will begin to produce SIVA charges, small bombs which guardians may pick up and throw at Vosik. With enough charge impacts his shield will fall, allowing him to be damaged for a short time. SIVA charges will continue to be produced during this period, and may also be used to damage him.
This process must be repeated until Vosik's health drops to about 15%, at which point he will retreat and the entrance to next area will open.
Vosik, the Archpriest
Vosik is next encountered in the Splicer's Den, standing on a platform overlooking a large room divided into 3 lanes, with spinners on the ceiling and four small rooms on the sides. He will be accompanied by a large number of minions and again protected by an impenetrable shield.
Shortly after the encounter begins, spinners in the ceiling of the room will activate and drop three SIVA charges; their exact positions vary but there will always be one on the left, one on the right, and one on the center. Guardians must gather these charges and synchronize their throws to hit Vosik with all three charges simultaneously to maximize damage to his shield.
After the charges have been thrown, one of the TV monitors behind Vosik will activate. This monitor must be targeted and destroyed by the entire fireteam, otherwise Vosik will use his area attack prematurely. Breaking the monitor will allow additional SIVA charges to drop, and this sub-cycle repeats until Vosik's shield is completely down, allowing the team to damage him.
Vosik will then regain his shield and begin to charge his ultimate attack, accompanied by the message "SIVA density critical". This attack may be survived by entering a "clean room" on either side of the main area. At any given time, only two of the four rooms are usable, one on the left and one on the right, but the entire fireteam should enter the same room together because each room may only be used once during the encounter. When every living member of the team has entered the clean room, it must be activated by shooting or meleeing the switch inside it before Vosik's attack fires.
After surviving the area attack, the entire cycle restarts. The guardians have five chances to drop Vosik's shield and do enough damage to kill him- there is no clean room available to survive the fifth area attack.
Upon death, Vosik will drop rewards and a SIVA cache will appear on the central platform. A passage will open at the rear of the right-side clean room closest to the monitors, leading to another jumping sequence and the next encounter.
Heroic
Six SIVA charges are dropped per syb-cycle instead of three, and Vosik's shield is twice as strong to ensure that the sub-cycles and encounter take roughly the same amount of time to complete if all charges are thrown accurately.
Siege Engine
The team will emerge into the Apex underneath the Siege Engine and venture out onto the top of The Wall, a vast open area with a barrier in the distance blocking further progress. Upon reaching the barrier, a short cutscene will play - the Siege Engine will activate and begin trundling towards the fireteam, laying down a barrage of fire with its turrets. Additionally, a large group of Splicer Dregs and Vandals will spawn from holes in the floor and Skiffs jump in to briefly provide air support. While fighting off these attackers, the team must also damage the siege engine- first targeting its two gun turrets, then the area exposed when both turrets have been destroyed.
After taking enough damage, the siege engine will suffer a hull breach. A chunk of debris will fall off its left side, allowing the fireteam to board it and escape being crushed against the barrier. The siege engine will kill any remaining enemies on the ground, knock down the barrier (guardians should stand back for this), and proceed further down the path towards a second barrier before breaking down.
The siege engine needs replacement parts to continue along the wall. Near the second barrier, a skiff will deliver a group of Fallen including a major Captain. Killing this captain will cause the skiff to drop the replacement parts- the driveshaft, the warhead, and the engine block- and leave, and will also start a hidden timer whose expiration will cause the siege engine to explode and wipe the fireteam. The parts must be quickly retrieved and inserted into the correct locations in the siege engine before the timer expires.
The fireteam must pick up the parts and begin carrying them back to the siege engine. Each guardian may only carry a part for ten seconds, after which they will drop the part and receive an "exhausted" debuff which prevents them from picking it back up for a further ten seconds. Thus, all guardians must participate in the relay, swapping the three parts back and forth to continue moving them down the path back to the siege engine. Guardians not carrying parts must protect carriers from hazards, such as enemy squads and mines which will greatly slow carrier progress if they are allowed to detonate. If a part is lost down a hole in the map, the siege engine will immediately explode. A final obstacle is Meksis, Siege Engineer, a unique enemy delivered directly to the siege engine itself. He will cause the engine to retract its ramp and prevent carriers from delivering parts, so he must be killed to finish the final leg of the relay.
The parts must then be inserted into the correct places on the siege engine; each part installed buys a little more time before detonation. The driveshaft is inserted into a bay immediately to the right of the ramp, the warhead goes into a receptacle in the middle of the vehicle, and the engine block's slot is diagonally across from the ramp, near the rear. Once all three parts are installed the Engine will begin moving again, demolishing the second barrier and killing any remaining enemies in its path.
The siege engine will continue along until it comes to a large gap in the wall, at which point it will (slowly) drive over the edge and topple into the sea. A loot chest is available on a rocky outcropping at the bottom of the gap, along with the path to the next area.
Heroic
A Walker is dropped in front of the siege engine's ramp at the same time that Meksis arrives.
Perfection Complex
The fireteam will eventually reach the heart of the Perfection Complex, a nearly lightless room. The encounter will not commence until a player steps into the swirling cloud of SIVA mites. Upon doing so, the room will light up, Aksis will be revealed, and a large number of enemies will appear. Much like Vosik's room, this area is divided into clear left, right, and center sections.
When most of the enemies have been killed, three Captains will appear, one in each section. Each one carries a cannon of a different element: arc, solar, or void, although which element appears where is random. These captains must be killed and their cannons claimed by three players.
Following the captains are three Servitors, again each associated with a different element and again each appearing in random locations- but never in the same place as the captain carrying the corresponding cannon was. Each player holding a cannon must locate their matching servitor and kill it, as the matched cannon is the only weapon that can damage them. The entire team must help to locate servitors so that they can be killed quickly, as their destinations are three charged plates set into the floor which will cause the fireteam to wipe if reached and activated.
Each servitor drops a SIVA charge upon death. A player who has picked up a cannon cannot pick up these charges, so the three remaining players must take them and throw them at SIVA panels which slide into view around the boss at this time. Once all the panels in a round have been damaged, the boss will summon large numbers of Shanks for a time, then begin again with another wave of minions, elemental captains, and servitors. The cycle must be completed three times, first with two panels, then with three, then with seven. In the final cycle, additional servitors will continue to spawn after the first three are killed, so the team must remain alert and continue to guide cannon carriers until all seven panels have been destroyed. Failure to destroy the panels will result in the boss achieving critical SIVA density and wiping the fireteam.
Completing the third cycle will depower Aksis and deliver loot to the center of the area. The final encounter of the raid may be completed by shooting the glowing region on his chest.
Heroic
There are three gun turrets in the area, one covering each section. The turrets will regenerate about 20 seconds after being killed, and will continue to do so for the entire encounter.
Aksis, Archon Prime
When Aksis is shot in the chest he will revive, fuse his upper body with a set of mechanical legs, and immediately summons large swarms of Shanks. Aksis has two common attacks, exploding bolts of SIVA and persistent swarm bombs that create hazardous regions around the area. He will also periodically teleport; guardians should be aware of his location and remain behind cover when possible. The locations to which Aksis can teleport are marked by yellow hazard stripes on the floor, and there are four such locations- left, right, center, and rear (directly opposite from Aksis's starting platform, near where the guardians landed after entering the perfection chamber). In this initial phase, Aksis will only use the left and right locations as well as his starting platform.
As in the previous encounter, three captains carrying elemental cannons will spawn, their cannons must be collected and used to quickly kill three matching servitors elsewhere in the area, and the servitors will drop bombs which may only be used by players without cannons. This time, panels do not appear, and the SIVA charges must be thrown at Aksis himself.
During this phase, three players at random will become "empowered", receiving a buff that increases their movement speed and creates a blue glowing effect on their view. These players must maneuver so that one is present in each "lane" of the area- left, right, and center. Once Aksis has been damaged by three SIVA charges, he will teleport. The nearest empowered player must immediately leap onto his back and press square/X to discharge their power into him, stunning him for a moment and making him vulnerable to damage. At this point, empowerment is again randomly distributed among the fireteam, and again the team must maneuver so that an empowered player is near each of the three remaining teleport locations. After a short time, this happens again- Aksis will teleport a second time, an empowered player must stun him a second time, and again empowerment will be reshuffled and players must relocate to maintain coverage. Any players who are not empowered should fire on Aksis at this time, as he remains vulnerable to damage throughout this entire process.
Aksis will teleport a third time, and must be stunned by an empowered player a third time. This time, he will remain vulnerable for a much longer time than before, and all players are free to damage him with any means of attack available. Any cannons remaining in the arena are to be prioritized, as they do much more damage than any of the players' own abilities or weapons.
Eventually Aksis will recover, teleport to his starting platform, and use his critical SIVA density attack. This time, the team must avoid the attack by leaping onto one of the four lighted pillars behind them, off the edge of the platform opposite from Aksis. As with the clean rooms, each pillar may be used only once, so the entire team must gather on the same one each time.
When Aksis is reduced to a small amount of health, he will teleport to the middle of the stage and again use his ultimate attack, but this time he will remain vulnerable to damage and must be killed before the attack fires. If the guardians succeed, he will die and the raid will be completed. Unlike other raids, the fireteam will be automatically returned to orbit after five minutes post-kill.
Heroic
Dropping Aksis's shield now requires seven SIVA charges; nine servitors will spawn per round to provide them.
Chests
In addition to the SIVA caches which appear after encounters are defeated, there are a number of secret chests hidden throughout the raid. These will grant legendary engrams and SIVA Key Fragments and have a chance to drop exotic gear.
Chest 1
The first chest is visible in plain sight after completing the first phase of the raid, while ascending out of the large sphere and entering the wall.
Chest 2
| This section lacks information and needs to be expanded. |
Chest 3
After defeating Vosik and entering the next jumping area, a path is available to the right. After entering this side area, climbing onto the catwalk and following it to the left will lead to the chest. This is also the area that contains the second hidden monitor.
Chest 4
Just before reaching the Siege Engine, a path is available by turning around and jumping up to a large beam that runs just under the ceiling. Following this beam to the end and turning the corner leads to the chest.
Chest 5
After riding the Siege Engine and falling down the cliff, the chest is inside a large broken pipe high overhead. It can be reached by jumping up the cliffside.
Chest 6
This chest is hidden within the same area as monitor 4, and accessed via the same method.
Monitors
Hidden throughout the raid are a set of 5 secret areas, most of which contain TV monitors that must be activated by players in proximity to them. Activating all the secrets is required to unlock the quest Channeling the Corruption. These secrets must all be activated in a single gameplay session; progress will be lost if the fireteam returns to orbit.
Monitor 1
This monitor may be located by entering the clean room to the left of Vosik and nearer to him, then jumping up through the fan blades and traveling to the end of the duct. This is easier to do after defeating Vosik, although it is still possible before.
Monitor 2
After leaving Vosik's chamber and proceeding halfway through the jumping sequence, a path will be available leading to the right on the opposite side of the area. The monitor is high up in the next room, and must be reached by jumping up the scaffolding.
Monitor 3
After repairing the Siege Engine, disembark off its rear before it plunges into the gap. On the right side of the Wall (facing the gap) there is a concrete outcropping that allows players to pass over the electrified rails and leap into an opening on the outer side of the wall, which leads to the monitor. Activating the monitor will open an exit that returns players to the main path.
Monitor 4
The fourth monitor is found inside the large pyramid in the Server Farm area. Opening the pyramid is a fairly involved process, requiring all six members of the fireteam to participate.
- Four of the players must remain in the pyramid room while two return to the previous area (the "server room") and locate two monitors. One monitor has a large red logo on the wall next to it, the other does not.
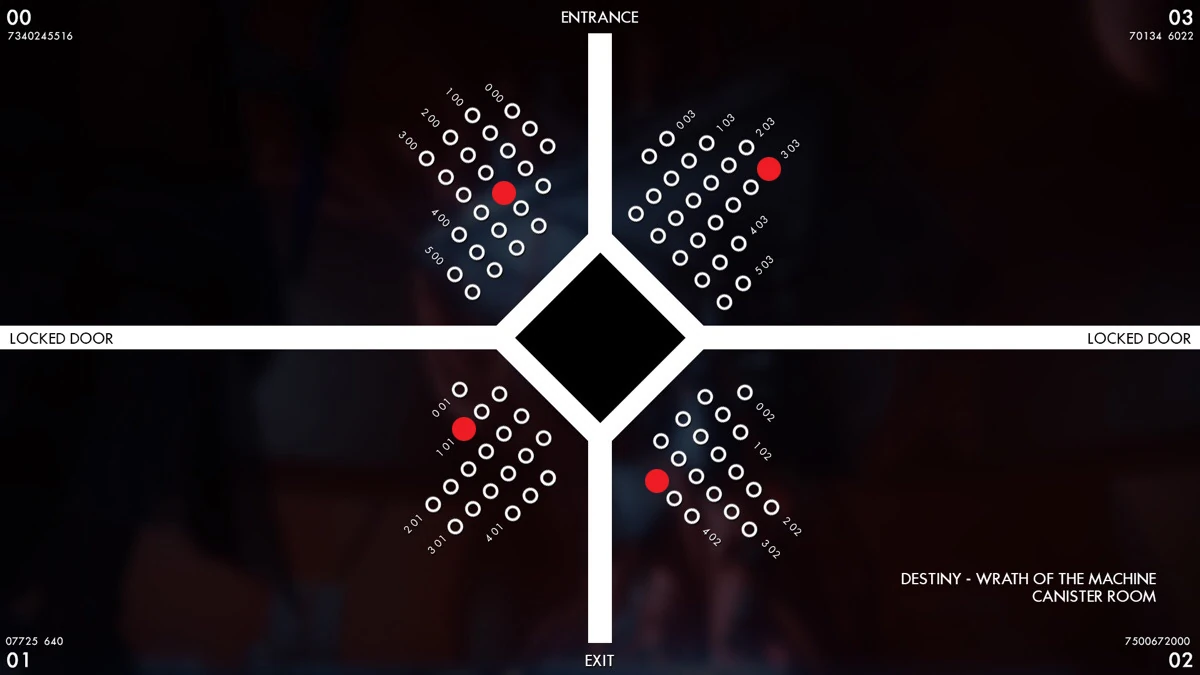
Map of the Server Room, numbered columns and rows of the servers, and the four Guardians' initial positions.
- The four players in the pyramid room must leap onto specific platforms, one in each numbered "quadrant" of the room. Exactly which platform to leap to is indicated by a secret image which was decoded as the ultimate goal of an ARG which appeared on the Bungie.net web site shortly after the raid unlocked. When all four players are in position, a chime will be heard and the two monitors in the server area become active.
- The server room players activate their monitors. The monitors will each display a number in binary. These numbers must be converted back to decimal and then interpreted as rows and columns corresponding to the layout of the platforms in the pyramid room- the monitor with the red logo displays the column (the numbered sets of platforms from left to right within each quadrant), and the monitor without displays the row (the platform within a column, starting at the catwalk and increasing towards the far wall). Both rows and columns are numbered starting at zero rather than one, so column zero is the leftmost and row zero is the platform nearest to the catwalk.
- The two monitors flash 4 pairs of numbers, for quadrants 0, 1, 2, and 3 in that order. Once each pair of numbers has been deciphered, the player standing on a platform in that quadrant must move to the newly indicated platform. Touching any platform other than the correct one will break the sequence, although it is safe to return to the catwalk. If a mistake is made at this point, the monitors will deactivated but remain enabled and the sequence may be restarted by reactivating them.
- Once all 4 players have relocated to their new platforms, all the platforms will light up and the central pyramid will open, revealing the fourth monitor.
Monitor 5
After defeating Aksis, a platform appears below the side of the main area near the lighted pillars. Jumping down to it reveals a path that leads to a secret room with a chest containing the initial quest item.
Loot
Normal
All loot obtained in Normal mode drops at a random Attack/Defense rating starting at 365.
Armor
- Hunter
- Titan
- Warlock
Weapons
- GENESIS CHAIN~ (auto rifle)
- CHAOS DOGMA~ (scout rifle)
- ETHER NOVA~ (fusion rifle)
- QUANTIPLASM~ (shotgun)
- SOUND AND FURY~ (rocket launcher)
Ghost Shells
Shaders
- Incarnadine (collect all 5 pieces of armor)
Heroic
All loot obtained in Heroic mode drops at a random Attack/Defense rating starting at 380.
Armor
- Hunter
- Spliced Nanomania Vest
- Spliced Nanomania Grasps
- Spliced Nanomania Mask
- Spliced Nanomania Boots
- Spliced Nanomania Cloak
- Perfected SIVA Shard
- Titan
- Spliced Cosmoclast Plate
- Spliced Cosmoclast Gauntlets
- Spliced Cosmoclast Helm
- Spliced Cosmoclast Greaves
- Spliced Cosmoclast Mark
- Perfected SIVA Core
- Warlock
- Spliced Red Miasma Robes
- Spliced Red Miasma Gloves
- Spliced Red Miasma Boots
- Spliced Red Miasma Hood
- Spliced Red Miasma Bond
- Perfected SIVA Capsule
Weapons
- STEEL MEDULLA~ (pulse rifle)
- FEVER AND REMEDY~ (hand cannon)
- EX MACHINA~ (sniper rifle)
- ZEAL VECTOR~ (sidearm)
- IF MATERIA~ (machine gun)
Ghost Shells
Jumpships
Shaders
- Nanopoesis (collect all 5 pieces of armor)
Other
- Isenfyre Token
- Machine God's Bane (emblem)
- SIVA Key Fragments
- The SIVA Solution (emblem for solving the Monitor Puzzle)
Gallery
")
Video
")
References
- ↑ 1.0 1.1 destinygame (2016) YouTube: Destiny: Rise of Iron – Wrath of the Machine Raid Trailer Retrieved September 22, 2016.