| This article does not meet Destiny Wiki's high standards. Help improve this article by cleaning it up! [Proposed: December 9, 2014] |
Crota's End is a raid in Ocean of Storms, the Moon.[1] It is part of the Destiny expansion The Dark Below and was immediately available upon the expansion's release. The level 33 difficulty became available on January 21, 2015.[2]
Guide
The Hellmouth
The first thing the fireteam will encounter when spawning in is an isolated platform on the rim of the Hellmouth. There will be a circular plate on the ground that a guardian must stand in, which will slowly form a bridge extending out over the pit. Once the bridge has been formed the team should walk out onto it towards the center and drop through the hole at the end to enter the Hellmouth and begin the raid.

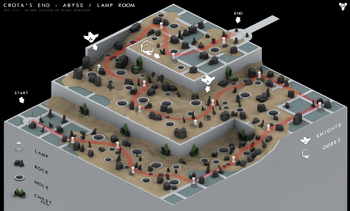
3D map of the Abyss.
The Abyss
The team will land in a lighted area at the bottom of the Hellmouth. A pillar of white light can be seen in the distance. This area, outside the starting point, will continuously apply a debuff called Weight of Darkness, which can stack up to 10 times. It disables the ability to double-jump and reduces movement speed. Weight of Darkness can only be removed by standing close to one of the lighted pillars. However, as each pillar is used, the light will eventually turn orange/red, indicating that it has absorbed as much darkness as it can. Once the light is a deep red it will explode, killing anyone caught in the blast. The team must travel from light to light, fighting off hordes of Thrall and the occasional Cursed Thrall and Knight until reaching the end of the area. This only requires 1 guardian to complete so if preferred the team may choose 1 player to complete this alone and the others can fight off the Thrall.
After reaching the last pillar there is another plate on the ground, similar to the one which triggered the bridge at the beginning of the raid. Once a guardian enters this circle, an enormous door opens to reveal a blinding white light, and a bridge gradually forms leading into it.
While the bridge is forming, three Knights and an Ogre will spawn. Once the bridge is formed, up to three additional Ogres and three additional Knights will spawn. They will continue to respawn until the players reach the end. An Ogre will occasionally spawn at the end of the bridge. At least one player must run into the light and reach the end, which will advance the team to the next raid phase and drop loot.
The Bridge
This area is divided into two separate platforms, connected by a temporary bridge which again must be formed by a guardian standing in a circle. Unlike previous bridge-forming circles, the guardian must remain in the circle to keep the bridge present, it will decay and disappear if the circle is not occupied. To both the left and right of the forming circle are floating pillars called Annihilation Totems. While the bridge is being formed, the totems will start turning orange and will wipe the team after a few seconds. This must be countered by having two additional players (one on each side) stand in the circles beneath the totems. The players can also abandon the attempt to form the bridge (by stepping out of the circle) to prevent a wipe if the totems have not yet fired.
The phase is begun when a guardian begins forming the bridge, which will trigger enemy spawns. Among the normal Hive enemies is a Swordbearer. When a Swordbearer is killed, it will drop a sword which one player must pick up within a brief period of time before it despawns. Only players carrying a sword may cross the bridge; swordless players who step onto it will be instantly killed from a debuff known as Bane of the Swordless. The sword will last for 1 minute after being picked up, so the other team members must coordinate to have the bridge fully formed at the moment the sword is claimed.
On the other side of the bridge, the sword carrier will encounter blue knight variants called Gatekeepers. These can only be damaged by the sword, so the carrier must kill them quickly before the sword disappears. One gatekeeper will spawn for each Swordbearer killed. The carrier must also be careful not to spend too much time in the bridge-forming circle on the far side as that will trigger a second set of annihilation totems.
Once the sword despawns, another Swordbearer will emerge and the process must be repeated to move a second player across the bridge, and then again for a third. At that point the two halves of the team switch roles, and the players on the far side of the bridge must use their own forming circle and anti-totem circles to form the bridge while the players remaining on the starting side obtain swords and come across.
The last player on the first side will have to solo the Swordbearer, but his teammates can provide supporting fire from the other side. The staircases to the left is a relatively safe spot to take cover if the number of enemies in the area is too great.
After all living members of the team make it to the far side two Ogres and a large number of supporting Hive will emerge from doors. Once the two Ogres are dead, the enemies will despawn, the large central door will open, and loot will be delivered. If all players on the starting side die, it is still possible to finish the stage as long as the players on the far side can survive.
The team must now run a gauntlet of Thralls, Cursed Thralls, and Shriekers to descend into the final area, containing the next two phases of the raid.
Ir Yût, the Deathsinger
This phase requires the team to kill Ir Yût, the Deathsinger, who is located within the chamber housing a large crystal and shielded off from the players. When the players enter the area, Ir Yût will begin a 3-minute timer. If she has not been defeated before this timer expires, the team will be wiped.
In order to access the Crystal Chamber to fight Ir Yût, the players must lure out the Wizards from either side, then kill them. After each Wizard dies, a Shrieker will activate on either side of the Crystal Chamber that must be destroyed (only if the "the Deathsinger prepares her song" prompt has appeared). Once both Wizards and both Shriekers have been killed, the Crystal Chamber will open, allowing access to Ir Yût. During the final 30 seconds of the timer, the Deathsinger will stop moving and a warning will be visible on the HUD, providing an opportune moment to attack. Once she is defeated, the time limit is lifted.
After Ir Yût has been defeated, begin killing off surrounding Hive Knights. The phase will be completed and loot will be dropped after killing a majority of the Knights.
Crota, Son of Oryx
Once Ir Yût's phase is complete, the crystal in Ir Yût's chamber may be used to spawn Crota, Son of Oryx by having every player stand very close to it. Once started, the shielded doorways will come up, sealing the team within the room while Knights and Acolytes spawn outside and surround it. Crota will spawn on the platform across from the crystal chamber. Once Crota has spawned, the shielded doors will drop and the horde will attack.
During this entire fight, a debuff will be active called "Presence of Crota" which prevents normal health regeneration. Health may be regenerated by claiming the Chalice of Light, an item which spawns in the arena below Crota and may be held by one player at a time. Picking up the Chalice or taking it from another player will immediately trigger regeneration and holding it will allow regeneration to work normally. Any weapon perks, armor perks, or subclass abilities that grant health regeneration will still work.
Sharing the Chalice among the team members is important because of the Oversoul, the glowing object hanging in the sky over the arena. If any team member dies, Crota will "summon his oversoul," which causes it to expand into a huge sphere. The remaining team members must fire their weapons at it until it fades from mottled white to flat gray and disappears. If this is not done within ten seconds, the entire team will be killed. Crota also has two normal attacks: he can fire Arc bolts and he also has a sword with which he can instantly kill any players who get too close to him.
Crota possesses a shield which can be damaged by normal weapons, but which will recharge instantly if not continuously fired upon. Once the shield is down, Crota will kneel for about five seconds. During these five seconds he is only vulnerable to Hive swords, which the players must obtain by killing a Swordbearer in the arena below his walkway. The team must precisely match the arrival of the player carrying the sword at Crota with the fall of his shield so that the sword may be used to do as much damage to his health as possible. Crota will flash orange before he rises from kneeling; the sword carrier must retreat at this point to avoid an instant-kill counterattack. Once Crota fades back to green, his shield may be dropped again for additional sword hits if it lasts long enough (like all other Hive swords, the sword will last for 1 minute after the enemy it drops from is killed).
After two Swordbearers are killed, two Hallowed Ogres will spawn underneath the towers housing the Knights using Boomers. They must be killed before another Swordbearer will spawn.
Crota will enrage if not killed within twelve minutes. While enraged, Crota will be able to use the Oversoul at any time, not just upon player death, and Ogres will spawn constantly.
Hard Mode
In addition to the Heroic modifier, playing Crota's End on the level 33 difficulty causes the following changes:
- Teammate revival is disabled.
- The Shriekers in the long hallway after the Bridge respawn quickly.
- During the Deathsinger encounter, the Liturgy of Ruin comes 1 minute quicker.
- There is no Chalice of Light during the Crota encounter.
- A Gatekeeper spawns with the Swordbearer during the Crota encounter.
- During the Crota encounter, when a pair of Boomers are killed, a Wizard spawns instead of a Cleaver Knight.
- Crota enrages when he reaches low health.
Gaining Loot
Reward Points
- After crossing the bridge at the bottom of the Hellmouth.
- After killing the two Ogres on the other side of the Totem bridge.
- After killing Ir Yût. Rewards raid class items, exotics, and Radiant Materials.
- After killing Crota.
Chests
There are two chests in this raid. Both chests contain Radiant Materials and only reward loot once per week regardless of difficulty.
- In the Abyss encounter, there are seven doors along the walls of the room that may contain the chest. Five doors are on the first floor along the left wall, and two doors are on the second floor along the right wall. The door with the chest will have an orange light above it. If everyone in the fireteam dies or reverts to the last checkpoint, the chest will respawn in a new random location. None of the tasks until this point require a fireteam, so it is possible to solo this chest.
- The second chest is located in the room after the Bridge on the other side of the hole that leads to the fight with Ir Yût. The door to this room closes after a period of time. First, the fireteam must kill the second Shrieker, which removes the barrier. Once the barrier is down, at least one player must get inside the room before the door closes. Once a player is in the room, the door will open automatically after a few seconds.
List of Loot
Normal and Hard
Weapons
Primary Weapons
- Hard Light, Exotic Auto Rifle
- SUROS Regime, Exotic Auto Rifle
- Monte Carlo, Exotic Auto Rifle

- Red Death, Exotic Pulse Rifle
- The Last Word, Exotic Hand Cannon
- Hawkmoon, Exotic Hand Cannon
- MIDA Multi-Tool, Exotic Scout Rifle
- No Land Beyond, Primary Exotic Sniper Rifle
- Universal Remote, Primary Exotic Shotgun
Special Weapons
- The 4th Horseman, Exotic Shotgun
- Ice Breaker, Exotic Sniper Rifle
- Patience and Time, Exotic Sniper Rifle
- Plan C, Exotic Fusion Rifle
Heavy Weapons
- Dragon's Breath, Exotic Rocket Launcher
- Gjallarhorn, Exotic Rocket Launcher
- Truth, Exotic Rocket Launcher
- Thunderlord, Exotic Machine Gun
Armor
Titan
- Willbreaker's Watch, Legendary Titan Helmet (Dropped by Crota)
- Willbreaker's Fists, Legendary Gauntlets
- Willbreaker's Resolve, Legendary Chest Armor
- Willbreaker's Greaves, Legendary Leg Armor
- Mark of the Pit, Legendary Mark
Hunter
- Unyielding Casque, Legendary Hunter Helmet (Dropped by Crota)
- Dogged Gage, Legendary Gauntlets
- Relentless Harness, Legendary Chest Armor
- Tireless Striders, Legendary Leg Armor
- Shroud of Flies, Legendary Cloak
Warlock
- Deathsinger's Gaze, Legendary Warlock Helmet (Dropped by Crota)
- Deathsinger's Grip, Legendary Gauntlets
- Deathsinger's Mantle, Legendary Chest Armor
- Deathsinger's Herald, Legendary Leg Armor
- Bone Circlet, Legendary Bond
Normal Mode Only
Weapons
Special Weapons
- Black Hammer, Legendary Sniper Rifle
- Light of the Abyss, Legendary Fusion Rifle
- Swordbreaker, Legendary Shotgun
Heavy Weapons
- Hunger of Crota, Legendary Rocket Launcher
- Song of Ir Yût, Legendary Machine Gun
Other
- Crota's End, Legendary Emblem
- "Light in the Abyss", Legendary Jumpship
- Cryptographic, Legendary Peach/Bronze Shader
Hard Mode Only
Primary Weapons
- Oversoul Edict, Legendary Pulse Rifle (Dropped by Completing The Abyss/Pit)
- Abyss Defiant, Legendary Auto Rifle (Dropped by Completing The Bridge)
- Word of Crota, Legendary Hand Cannon (Dropped by Defeating Crota)
- Fang of Ir Yût, Legendary Scout Rifle (Dropped by Defeating Crota)
Other
- "Bane of Dark Gods", Legendary Jumpship
- S-13 "Graverobber", Legendary Sparrow
- Glowhoo, Legendary Shader
- Crux of Crota (used to upgrade Eidolon Ally into Necrochasm)
References
- ↑ Bungie.net "Expansion I: The Dark Below". Retrieved October 30, 2014.
- ↑ Dague, David. (2015) "Bungie Weekly Update - 01/15/2015". Bungie.net. Retrieved January 16, 2015.
Videos
Gallery
")
")
")