mNo edit summary Tag: rte-source |
No edit summary Tag: rte-source |
||
| Line 1: | Line 1: | ||
| − | {{Cleanup|September 29, 2016}} |
||
{{Infobox/Quest |
{{Infobox/Quest |
||
|image=File:A_sword_reforged_quest_icon.png |
|image=File:A_sword_reforged_quest_icon.png |
||
| Line 10: | Line 9: | ||
|itemhash=2020263354 |
|itemhash=2020263354 |
||
}} |
}} |
||
| − | '''Channeling the Corruption''' is a [[quest]] in ''[[Rise of Iron]]'' that ultimately rewards the [[Rarity|exotic]] [[Pulse Rifle|pulse rifle]] [[Outbreak Prime]].<ref>{{RefWebsite|website=Reddit|url=https://www.reddit.com/r/DestinyTheGame/comments/54wjym/spoiler_a_comprehensive_writeup_of_outbreak_prime/|title=A Comprehensive Writeup of Outbreak Prime|accessed=September 28, 2016}}</ref> |
+ | '''Channeling the Corruption''' is a [[quest]] in ''[[Rise of Iron (Expansion)|Destiny: Rise of Iron]]'' that ultimately rewards the [[Rarity|exotic]] [[Pulse Rifle|pulse rifle]] [[Outbreak Prime]].<ref>{{RefWebsite|website=Reddit|url=https://www.reddit.com/r/DestinyTheGame/comments/54wjym/spoiler_a_comprehensive_writeup_of_outbreak_prime/|title=A Comprehensive Writeup of Outbreak Prime|accessed=September 28, 2016}}</ref> |
| + | ==Acquisition== |
||
| − | ==Acquiring the Quest== |
||
| − | To acquire the quest, a [[fireteam]] must enter the raid and activate five hidden monitors before exiting. |
+ | To acquire the quest, a [[fireteam]] must enter the [[Wrath of the Machine (Raid)|Wrath of the Machine]] [[raid]] and activate five hidden monitors before exiting. |
| + | |||
| + | Progress is instanced-based. This means that if the fireteam (or fireteam member) leaves the raid instance and starts again, even if they load a checkpoint, they will lose monitor progress. It also means that new fireteam members joining the same instance will be able to open the chest near the fifth monitor even if they hadn't been there for the other monitors. |
||
;Monitor #1 (Vosik) |
;Monitor #1 (Vosik) |
||
| + | |||
| − | : |
||
| − | Location is the "Monitor Room" where [[Vosik]] is challenged a second time. In the left |
+ | Location is the "Monitor Room" where [[Vosik]] is challenged a second time. In the safe room on the left closest to Vosik, a [[Guardian]] can make his or her way up between the ceiling fan blades to find a hidden room containing the first monitor. The blades of the fan will be removed after defeating Vosik to allow access. |
;Monitor #2 (Pipes) |
;Monitor #2 (Pipes) |
||
| + | |||
| − | : |
||
Location is the jumping section between Vosik and the Siege Engine. Halfway through the jumping sections, Guardians can take a detour to the right to locate a hidden chest above on a scaffolding. In this room, the monitor will be much higher up. |
Location is the jumping section between Vosik and the Siege Engine. Halfway through the jumping sections, Guardians can take a detour to the right to locate a hidden chest above on a scaffolding. In this room, the monitor will be much higher up. |
||
;Monitor #3 (Siege Engine) |
;Monitor #3 (Siege Engine) |
||
| + | |||
| − | : |
||
| − | Location is at the end of the Siege Engine |
+ | Location is at the end of the Siege Engine encounter prior to jumping downward toward the next checkpoint. After the Siege Engine breaks through the second wall, a Guardian can stay on the highway that was traveled on. At the section where the ramp begins to slope downward, a Guardian can turn and look back on the right side of the highway to locate a brown and rusted shelving plate attached to the side of the highway that can be shot. While being shot, the door will continually say "immune." Continue shooting until the plate explodes off. Enter the side of the side walling to locate the hidden room containing the monitor. |
;Monitor #4 (Cylinder Room) |
;Monitor #4 (Cylinder Room) |
||
| − | : |
||
| + | Two Guardians in the maze room must find two monitors and activate them simultaneously. When activated, the monitors will display a binary number that must be translated to decimal. The left monitor's number correlates a row of cylinders in the cylinder room, and the right monitor's number correlates to a cylinder in that row. |
||
| − | This monitor requires a couple of inter-connected activities to complete. Starting with the first two Guardians in the maze room, each must find an interactive monitor (once one is found the other is directly across the pathway). Each of these monitors, when activated, provide a binary code. One monitor gives a binary code that translates to a number corresponding with a row of cylinders that a Guardian in the cylinder room must jump to. The second monitor gives a binary code that translates to a number corresponding with the actual cylinder the Guardian in the cylinder room must jump on. Once the codes are displayed, the team has approximately 7 seconds to translate the code and to get a Guardian in the cylinder room to jump on the codes' corresponding row and cylinder. |
||
| + | The other four Guardians must go to the cylinder room. This room is divided into quadrants labeled by numbers on the wall: 00, 01, 02, 03. |
||
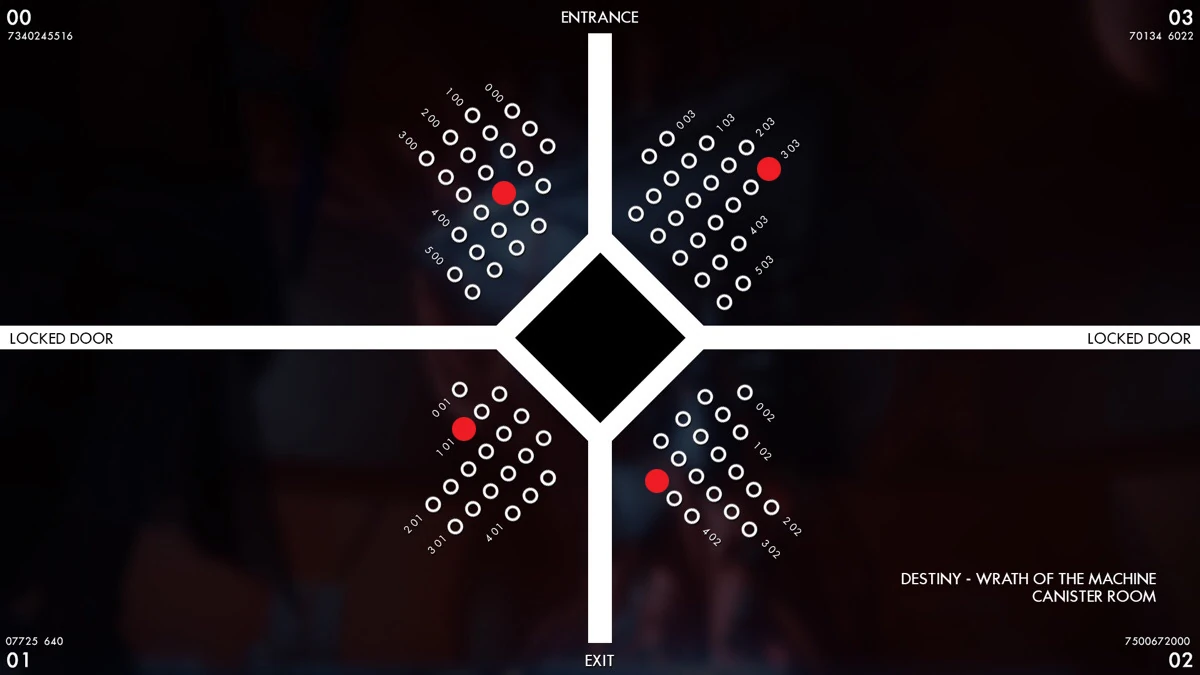
| − | As briefly mentioned, there are two locations Guardians must occupy at once; two Guardians must remain in the SIVA [[Vandal]] maze room (after defeating all the enemies) and the other four Guardians must continue forward to the room with rows of cylinders. To begin the puzzle, Guardians must access the cylinder room and stand on specific cylinders (one Guardian for each quadrant) to give power to the two interactive monitor's in the SIVA maze room. The picture displays which canister must be stood on for initial activation. Be sure to stand for nearly 10 seconds before checking progress. If the team stood on the correct cylinders, a slight noise may be heard and the pillars in the SIVA maze will now radiate with the bright-red [[SIVA]] color. |
||
[[File:ServerRoomMap.jpg|thumb|250px|Map of the Server Room, numbered columns and rows of the servers, and the four Guardians' initial positions.]] |
[[File:ServerRoomMap.jpg|thumb|250px|Map of the Server Room, numbered columns and rows of the servers, and the four Guardians' initial positions.]] |
||
| + | When the two Guardians activate their monitors, they will translate their binary numbers to decimal numbers and then communicate them to the Guardians in the cylinder room. The first set of numbers corresponds to a cylinder in quadrant 00. A Guardian in that room has approximately 10 seconds to locate that cylinder and stand on it. Once the cylinder is being stood on, a sound will be heard, and the monitors will display a new number which correlates to a cylinder in quadrant 01. Another Guardian must locate that cylinder and stand on it. The fireteam must repeat this process for quadrant 02 and then 03. |
||
| − | In the room with all the cylinders, the Guardians can take note of the large numbers on the walls that shape the perimeter of the room. The wall with a "00" will be the first quadrant a Guardian must use when jumping to the proper row and cylinder (as instructed by the preceding two Guardians in the maze room). The quadrant to the left, "01", will be the second quadrant during the second sequences of numbers. The quadrant to the left, "02", will be the third quadrant during the third sequences of numbers. The quadrant to the left, "03", will be the fourth quadrant during the fourth sequences of numbers. A row of cylinders is considered from the first cylinder at the perimeter wall, moving toward the Guardian, and ending at the cylinder just below the walkway. The number of rows is counted by moving from left to right. If the preceding Guardians call out "Row 2", "Cylinder 3" then the Guardian must find the third cylinder in the second row and jump to it. Each section requires the same method; jumping to the corresponding cylinder in the correct row which is provided by the two Guardians in the [[Fallen]] maze room. |
||
| − | + | As a guide, the binary numbers from the monitors are translated as follows: |
|
| − | *0000=0 |
+ | *'''0000''' = 0 |
| − | *0001=1 |
+ | *'''0001''' = 1 |
| − | *0010=2 |
+ | *'''0010''' = 2 |
| − | *0011=3 |
+ | *'''0011''' = 3 |
| − | *0100=4 |
+ | *'''0100''' = 4 |
| − | *0101=5 |
+ | *'''0101''' = 5 |
| + | Once all four Guardians are standing on the correct cylinders, a louder noise will be heard and the central casing in the cylinder room will be lifted. The team will find the fourth monitor and a chest containing an exotic item and the [[emblem]] [[The SIVA Solution]]. |
||
| − | One Guardian will call from his or her monitor the row to be jumped to (for example, 0010 is the second row) while the second will call from his or her monitor the cylinder to be jumped on (for example, 0100 is the fourth cylinder). These interpretations would have the "00 quadrant" Guardian jump to the fourth cylinder in the second row. Approximately 10 seconds later the monitors will provide another set of binary codes to be called out, which would have the Guardian in the "01" quadrant jump to the cylinder closest to the catwalk in the third row. This process will continue until all four Guardians in the cylinder room are standing on a cylinder. Continue waiting for approximately 10 seconds until a loud noise is heard and the central casing in the cylinder room is lifted. Find an exotic chest and the monitor in the center of the exposed SIVA core. |
||
;Monitor #5 (Aksis) |
;Monitor #5 (Aksis) |
||
| − | : |
||
| ⚫ | The location is in the final arena where [[Aksis]] is destroyed after the second phase. Return to the spawn point and peer over the railing. Follow the perimeter of the railing to the right while looking over and below to find a secret platform that allows access to a hidden room and a chest containing a [[SIVA Engine]], which starts |
||
| ⚫ | The location is in the final arena where [[Aksis]] is destroyed after the second phase. Return to the spawn point and peer over the railing. Follow the perimeter of the railing to the right while looking over and below to find a secret platform that allows access to a hidden room and a chest containing a [[SIVA Engine]], which starts the quest. |
||
| ⚫ | |||
| − | *If the fireteam leaves the raid prior to activating all 5 monitors, the monitor progress will start over and will require the team to restart the raid to reactivate the monitors. |
||
| − | *A player may join a fireteam in the raid at any time without losing the monitor progress that the raid team has achieved. |
||
| − | *Once the quest is obtained, the questline will require a three-man fireteam consisting of one [[Titan]], one [[Warlock]], and one [[Hunter]]. Fireteams can reduce the stress and wait-time of the questline by ensuring they maintain a team throughout the raid and questline, as the questline also requires a fireteam member to be at the same point of the questline as the host. |
||
==Quest Steps== |
==Quest Steps== |
||
| ⚫ | |||
| − | The questline has 10 steps to be completed before receiving the raid's exotic pulse rifle. Refer to the following steps to complete the quest line. |
||
| + | {{QuestStep |
||
| + | |title='''An Engine Less Ordinary''' |
||
| + | |description=Visit Shiro-4. He may be interested in the device you found. |
||
| + | |objectives= |
||
| + | |rewards= |
||
| + | }} |
||
| + | ===Step Two=== |
||
| − | 1) *The "Be the Battery" task requires a [[Warlock|Warlock (W)]], [[Titan|Titan (T)]], and [[Hunter|Hunter (H)]] fireteam at the same step to conduct the following together: |
||
| + | {{QuestStep |
||
| − | *Finish a Nightfall [[Strike]] |
||
| + | |title='''Be the Battery''' |
||
| ⚫ | |||
| + | |description=Complete objectives with a Fireteam comprising a Hunter, Titan, and Warlock. |
||
| − | *Finish 3 Heroic Strikes or [[Crucible]] Matches |
||
| + | |objectives=*[[Weekly Nightfall Strike|Nightfall Strike]] complete |
||
| ⚫ | |||
| ⚫ | |||
| + | *3 Crucible Matches or Heroic Strikes |
||
| ⚫ | |||
| + | |rewards= |
||
| + | }} |
||
| + | ===Step Three=== |
||
| − | Many teams followed Datto's lead in selecting [[Elimination]] for their Crucible portion with the intent to immediately lose each round for fastest completion. After the 4 tasks are completed, the quest line will advance to the second step. |
||
| + | {{QuestStep |
||
| + | |title='''That Light May Bind''' |
||
| + | |description=Sychronize the SIVA Engine's energy flow. |
||
| + | |objectives= |
||
| + | |rewards= |
||
| + | }} |
||
| + | |||
| + | A Hunter, Titan, and Warlock in the same fireteam must inspect their SIVA Engine in their inventory and enter a code. The Influx Capacitor node has the engine's starting value, and the Binding Circuit node has the required final value. The nodes in the middle are labeled as "capacitors," which add values, and "resistors," which subtract values. If the node has "dual" in its name, the value is actually double what's displayed; if the node has "half" in its name, its value is actually half what's displayed. Each Guardian must use the Capacitor and Resistor nodes to add and subtract values from their Influx Capacitor node to eventually come to the value to the Binding Circuit node. Once the correct nodes are selected, the Influx Capacitor node may be selected to complete the puzzle. |
||
| + | |||
| + | '''SPOILER''' - the solutions are as follows: |
||
| − | 2) "That Light May Bind" is the second step and requires the specific fireteam to enter in a code within their SIVA engine (located in the inventory screen). Each class has a different code to input. Use this guide to input the class' specific code. |
||
*Hunters: 23223 |
*Hunters: 23223 |
||
| ⚫ | |||
*Titans: 32323 |
*Titans: 32323 |
||
| ⚫ | |||
| + | ===Step Four=== |
||
| − | Inputting the codes together and syncing the SIVA engine will bring the characters to the third task. Note that this task MUST BE DONE with the [[Warlock|(W)]], [[Titan|(T)]], and [[Hunter|(H)]] fire team before one can progress to step three; "Parts of a Whole". |
||
| + | {{QuestStep |
||
| + | |title='''A Closer Look''' |
||
| + | |description=Return to Shiro-4 with the SIVA Engine. |
||
| + | |objectives= |
||
| + | |rewards= |
||
| + | }} |
||
| + | ===Step Five=== |
||
| − | 3) The "Parts of a Whole" step is the first step that allows players to branch off individually for step completion. Be advised that later steps will require the team to reunite for completion. In the third step the guardians are required to finish the following: |
||
| + | {{QuestStep |
||
| − | *Explore the Plaguelands 0%--100% |
||
| + | |title='''Parts of a Whole''' |
||
| ⚫ | |||
| + | |description=Attack Fallen in the Plaguelands. Gather the SIVA tech Shiro-4 needs. |
||
| + | |objectives=*Actively explore the Plaguelands |
||
| + | **Killing an enemy will grant the Guardian two SIVA Tech, which is about 0.5%. A [[Public Event]] grants 90 SIVA Tech, about 22%. |
||
| ⚫ | |||
*Destroy Sepiks Perfected |
*Destroy Sepiks Perfected |
||
| + | |rewards= |
||
| + | }} |
||
| + | ===Step Six=== |
||
| − | Killing an enemy will grant the player two "Siva Techs" and 4 "Siva Techs" will seemingly grant 1%; however, a [[Public Event]] grants the player 90 "Siva Techs" which calculates to 22%. A fast method to completing this task is to first defeat the Sepiks Perfected Strike followed by going to the [[Plaguelands]] and heading straight to the Archons Forge (as they count as Public Events.) |
||
| + | {{QuestStep |
||
| + | |title='''Equalization Equation''' |
||
| + | |description=Equalize the SIVA Engine's energy flow across patterns. |
||
| + | |objectives= |
||
| + | |rewards= |
||
| + | }} |
||
| + | '''SPOILER''' - the solutions are as follows: |
||
| − | After completing the "Parts of a Whole" step, the players must reunite in a 3-man fire team with their opposing classes (fire team must have the (H), (W), and (T) together). The SIVA Engine at this point must be charged by having the players input yet another code into their SIVA Engine. Use the following guide to easily input the appropriate code: |
||
| − | *Hunters 24414 |
||
| − | *Warlocks 13334 |
||
| − | *Titans 42123 |
||
| + | *Hunter: 41233 or 24414 |
||
| − | After inputting the codes, the quest line will advance to the next step which requires the host of the quest to complete the raid once again. The quest line needs three engine parts that come as drops from the raid bosses. The quest requires a team to defeat the three bosses in the raid (Vosik, the Zamboni, and [[Aksis]]). The team then receives one part from each boss. Once the three parts are obtained, the fireteam will advance to the final step which again requires the fireteam containing a [[Hunter|(H)]], [[Warlock|(W)]], and [[Titan|(T)]] (all on the same step as well). |
||
| + | *Titan: 42123 or try 24344 |
||
| + | *Warlock: 23444 or 13334 |
||
| + | ===Step Seven=== |
||
| − | During the final step, the players must enter in a mathematical calculation that ends with the number 730. The player will notice their first number (which is the start number) and must use the next 5 columns to both add and subtract consecutively in an attempt to meet the required 730 number at the end of the sequence (occasionally the end number might not equal 730). Note the top three rows add while the bottom two rows subtract. One can use this https://2g.be/tools/siva/ site for an easy solution. |
||
| + | {{QuestStep |
||
| + | |title='''Running the Math''' |
||
| + | |description=Return to Shiro-4 with the SIVA Engine. |
||
| + | |objectives= |
||
| + | |rewards= |
||
| + | }} |
||
| + | ===Step Eight=== |
||
| − | Once the codes have been entered by all fireteam members, the final step is to talk with [[Shiro-4]] to finally receive the long-awaited pulse rifle. Obtaining the pulse rifle will also clear one of the exotic quests from the [[Rise of Iron|Rise of Iron Book]] (the other three being [[Khvostov 7G-02]], [[Thorn (Year 3)]], and [[Gjallarhorn]]. Congratulations on a deed well deserved. |
||
| + | {{QuestStep |
||
| + | |title='''Research and Destroy''' |
||
| + | |description=Defeat the Devil Splicers' leaders in the "Wrath of the Machine" Raid. |
||
| + | |objectives=3 SIVA Control Grids collected |
||
| + | |rewards= |
||
| + | }} |
||
| + | SIVA Control Grids drop after completion of Vosik Phase 2, Siege Engine, and Aksis Phase 2. They can drop multiple times from the same encounter, so fireteams may choose to complete the same encounter multiple times. |
||
| − | Occasionally one player within the fireteam will receive the gun and the other two will not. If this happens return to orbit, then proceed back into the Iron Temple. After you land at the Iron Temple all three players must enter their code and press X or A at the same time. |
||
| + | |||
| + | ===Step Nine=== |
||
| + | {{QuestStep |
||
| + | |title='''An Unknowable Science''' |
||
| + | |description=Equalize the SIVA Engine's energy flow across randomized patterns. |
||
| + | |objectives= |
||
| + | |rewards= |
||
| + | }} |
||
| + | This puzzle does not have a set solution, but an online calculator exists [https://2g.be/tools/siva/ here]. |
||
| + | |||
| + | ===Step Ten=== |
||
| + | {{QuestStep |
||
| + | |title='''Outbreak Prime''' |
||
| + | |description=Return to Shiro-4 with the Infection Engine. |
||
| + | |objectives= |
||
| + | |rewards=[[Outbreak Prime]] |
||
| + | }} |
||
==References== |
==References== |
||
Revision as of 04:29, 25 July 2017
Channeling the Corruption is a quest in Destiny: Rise of Iron that ultimately rewards the exotic pulse rifle Outbreak Prime.[1]
Acquisition
To acquire the quest, a fireteam must enter the Wrath of the Machine raid and activate five hidden monitors before exiting.
Progress is instanced-based. This means that if the fireteam (or fireteam member) leaves the raid instance and starts again, even if they load a checkpoint, they will lose monitor progress. It also means that new fireteam members joining the same instance will be able to open the chest near the fifth monitor even if they hadn't been there for the other monitors.
- Monitor #1 (Vosik)
Location is the "Monitor Room" where Vosik is challenged a second time. In the safe room on the left closest to Vosik, a Guardian can make his or her way up between the ceiling fan blades to find a hidden room containing the first monitor. The blades of the fan will be removed after defeating Vosik to allow access.
- Monitor #2 (Pipes)
Location is the jumping section between Vosik and the Siege Engine. Halfway through the jumping sections, Guardians can take a detour to the right to locate a hidden chest above on a scaffolding. In this room, the monitor will be much higher up.
- Monitor #3 (Siege Engine)
Location is at the end of the Siege Engine encounter prior to jumping downward toward the next checkpoint. After the Siege Engine breaks through the second wall, a Guardian can stay on the highway that was traveled on. At the section where the ramp begins to slope downward, a Guardian can turn and look back on the right side of the highway to locate a brown and rusted shelving plate attached to the side of the highway that can be shot. While being shot, the door will continually say "immune." Continue shooting until the plate explodes off. Enter the side of the side walling to locate the hidden room containing the monitor.
- Monitor #4 (Cylinder Room)
Two Guardians in the maze room must find two monitors and activate them simultaneously. When activated, the monitors will display a binary number that must be translated to decimal. The left monitor's number correlates a row of cylinders in the cylinder room, and the right monitor's number correlates to a cylinder in that row.
The other four Guardians must go to the cylinder room. This room is divided into quadrants labeled by numbers on the wall: 00, 01, 02, 03.
Map of the Server Room, numbered columns and rows of the servers, and the four Guardians' initial positions.
When the two Guardians activate their monitors, they will translate their binary numbers to decimal numbers and then communicate them to the Guardians in the cylinder room. The first set of numbers corresponds to a cylinder in quadrant 00. A Guardian in that room has approximately 10 seconds to locate that cylinder and stand on it. Once the cylinder is being stood on, a sound will be heard, and the monitors will display a new number which correlates to a cylinder in quadrant 01. Another Guardian must locate that cylinder and stand on it. The fireteam must repeat this process for quadrant 02 and then 03.
As a guide, the binary numbers from the monitors are translated as follows:
- 0000 = 0
- 0001 = 1
- 0010 = 2
- 0011 = 3
- 0100 = 4
- 0101 = 5
Once all four Guardians are standing on the correct cylinders, a louder noise will be heard and the central casing in the cylinder room will be lifted. The team will find the fourth monitor and a chest containing an exotic item and the emblem The SIVA Solution.
- Monitor #5 (Aksis)
The location is in the final arena where Aksis is destroyed after the second phase. Return to the spawn point and peer over the railing. Follow the perimeter of the railing to the right while looking over and below to find a secret platform that allows access to a hidden room and a chest containing a SIVA Engine, which starts the quest.
Quest Steps
Step One
| An Engine Less Ordinary | |
| "Visit Shiro-4. He may be interested in the device you found."
|
Step Two
| Be the Battery | |
| "Complete objectives with a Fireteam comprising a Hunter, Titan, and Warlock."
|
Step Three
| That Light May Bind | |
| "Sychronize the SIVA Engine's energy flow."
|
A Hunter, Titan, and Warlock in the same fireteam must inspect their SIVA Engine in their inventory and enter a code. The Influx Capacitor node has the engine's starting value, and the Binding Circuit node has the required final value. The nodes in the middle are labeled as "capacitors," which add values, and "resistors," which subtract values. If the node has "dual" in its name, the value is actually double what's displayed; if the node has "half" in its name, its value is actually half what's displayed. Each Guardian must use the Capacitor and Resistor nodes to add and subtract values from their Influx Capacitor node to eventually come to the value to the Binding Circuit node. Once the correct nodes are selected, the Influx Capacitor node may be selected to complete the puzzle.
SPOILER - the solutions are as follows:
- Hunters: 23223
- Titans: 32323
- Warlocks: 31313
Step Four
| A Closer Look | |
| "Return to Shiro-4 with the SIVA Engine."
|
Step Five
| Parts of a Whole | |
| "Attack Fallen in the Plaguelands. Gather the SIVA tech Shiro-4 needs."
|
Step Six
| Equalization Equation | |
| "Equalize the SIVA Engine's energy flow across patterns."
|
SPOILER - the solutions are as follows:
- Hunter: 41233 or 24414
- Titan: 42123 or try 24344
- Warlock: 23444 or 13334
Step Seven
| Running the Math | |
| "Return to Shiro-4 with the SIVA Engine."
|
Step Eight
| Research and Destroy | |
| "Defeat the Devil Splicers' leaders in the "Wrath of the Machine" Raid."
|
SIVA Control Grids drop after completion of Vosik Phase 2, Siege Engine, and Aksis Phase 2. They can drop multiple times from the same encounter, so fireteams may choose to complete the same encounter multiple times.
Step Nine
| An Unknowable Science | |
| "Equalize the SIVA Engine's energy flow across randomized patterns."
|
This puzzle does not have a set solution, but an online calculator exists here.
Step Ten
| Outbreak Prime | |
| "Return to Shiro-4 with the Infection Engine."
|
References
- ↑ Reddit "A Comprehensive Writeup of Outbreak Prime". Retrieved September 28, 2016.